


Introduction
Knowledge visualization is a vital side of knowledge evaluation, aiding in comprehending and speaking advanced datasets. Among the many myriad visualization methods accessible, space charts stand out for successfully representing quantitative knowledge over time or classes. This complete information delves into the intricacies of space charts, exploring their definition, advantages, creation, customization, and superior methods utilizing Python libraries reminiscent of Plotly.
What’s an Space Chart?
An space chart is a kind of knowledge visualization that shows quantitative knowledge over time or classes. It’s just like a line chart, however the space between the road and the x-axis is stuffed with coloration, visually representing the info’s magnitude. Space charts are generally used to point out a number of variables’ cumulative totals or examine the proportions of various classes.
Advantages of Utilizing Space Charts in Knowledge Visualization
Space charts supply a number of benefits in knowledge visualization. Firstly, they clearly signify the magnitude and developments of knowledge over time or classes. The stuffed space makes it straightforward to match the values of various variables or classes at a look. Moreover, space charts can successfully show constructive and destructive values, permitting for a complete knowledge evaluation. Furthermore, space charts are visually interesting and might improve the general aesthetics of knowledge visualization.
To create and customise space charts in Python, you should use libraries reminiscent of Plotly, Seaborn, and Matplotlib. These libraries present a variety of choices to customise the looks of the realm chart, together with coloration schemes, labels, legends, and annotations. By producing your brief dataframe with related knowledge, you may simply plot and customise space charts to fit your particular necessities.
Step-by-Step Information with Code Examples
Plotly is a strong Python library that permits you to create interactive and visually interesting knowledge visualizations, together with stuffed space charts. This part will present a step-by-step information on creating stuffed space charts utilizing Plotly, together with code examples.
To start, you’ll need to put in the Plotly library. You are able to do this by operating the next command in your Python surroundings:
Code:
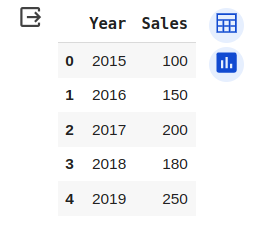
pip set up plotlyAfter you have put in Plotly, you may import the required modules and create a brief dataframe to plot the values. For instance, let’s make a dataframe with two columns: “12 months” and “Gross sales”. Right here’s the code to create the dataframe:
Code:
import pandas as pd

knowledge = '12 months': [2015, 2016, 2017, 2018, 2019],

        'Gross sales': [100, 150, 200, 180, 250]

df = pd.DataFrame(knowledge)

df.head()
Output:
Subsequent, you should use the Plotly library to create a stuffed space chart. Right here’s the code to generate a fundamental stuffed space chart:
Code:
import plotly.categorical as px

fig = px.space(df, x='12 months', y='Gross sales')

fig.present()
Output:
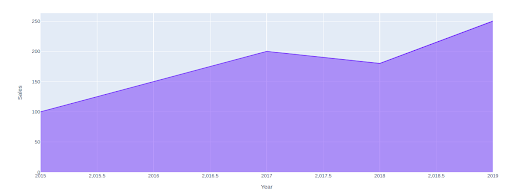
This code will create a stuffed space chart with the “12 months” column on the x-axis and the “Gross sales” column on the y-axis. You may customise the chart additional by including labels, titles, and adjusting the colour scheme.
Customizing Space Charts in Plotly
Plotly gives numerous customization choices to boost the looks of your space charts. You may customise the fill coloration, line coloration, opacity, and extra. Listed below are a number of examples of how one can customise your space charts utilizing Plotly:
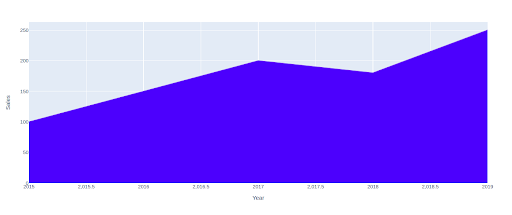
Altering the fill coloration: You may specify a unique fill coloration on your space chart through the use of the “coloration” parameter. For instance, you may set the fill coloration to blue by including the next line of code:
Code:
import plotly.categorical as px

fig = px.space(df, x='12 months', y='Gross sales')

fig.update_traces(fillcolor="blue")

fig.present()
Output:
Including a line border: You may add a line border to your space chart by specifying the road coloration and width. For instance, you may add a purple line border with a width of two pixels by including the next line of code:
Code:
import plotly.categorical as px

fig = px.space(df, x='12 months', y='Gross sales')

fig.update_traces(line=dict(coloration="purple", width=5))

fig.present()
Output:

These are just some examples of how one can customise your space charts utilizing Plotly. Experiment with totally different customization choices to create visually gorgeous and informative stuffed space charts.
Superior Methods for Space Charts
Space charts are a strong visualization instrument in Python that enables us to signify knowledge visually, interesting, and informatively. This part will discover some superior methods for creating and customizing space charts.
Creating Stacked Space Charts
Stacked space charts are useful once we need to examine the contribution of various classes to the entire. They’re generally utilized in finance, economics, and different fields the place it’s important to know the composition of a complete.
Advantages and Use Circumstances of Stacked Space Charts
Stacked space charts supply a number of advantages. Firstly, they permit us to visualise every class’s whole worth and particular person contributions. This helps us perceive the relative significance of every class and the way it modifications over time. Secondly, stacked space charts make figuring out developments and patterns within the knowledge straightforward. By stacking the areas on prime of one another, we will see how the composition of the entire modifications over time.
Stacked space charts are generally utilized in monetary evaluation to visualise the efficiency of various sectors or industries inside a market index. They’re additionally useful in monitoring the progress of varied tasks or initiatives inside a corporation.
Steps to Create a Stacked Space Chart in Python
We are able to use libraries reminiscent of Plotly, Seaborn, or Matplotlib to create a stacked space chart in Python. Right here, we are going to concentrate on utilizing Plotly.
First, we should import the required libraries and create a brief dataframe to plot our values. We are able to use the Pandas library to create a dataframe with random values.
Code:
import pandas as pd
import plotly.categorical as px
# Create a dataframe with random values
knowledge = pd.DataFrame(
'12 months': [2015, 2016, 2017, 2018, 2019],
'Class A': [10, 20, 30, 40, 50],
'Class B': [20, 30, 40, 50, 60],
'Class C': [30, 40, 50, 60, 70]
)
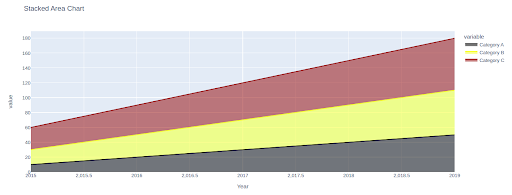
# Create a stacked space chart
fig = px.space(knowledge, x='12 months', y=['Category A', 'Category B', 'Category C'], title="Stacked Space Chart")
fig.present()Output:
By specifying the x-axis as ‘12 months’ and the y-axis because the classes, we will create a stacked space chart exhibiting every class’s contribution over time. The ensuing chart might be displayed as “Stacked Space Chart.”
Customizing Stacked Space Charts
Plotly gives a variety of customization choices for stacked space charts. We are able to customise the colours, labels, axes, and different visible components to make the chart extra visually interesting and informative.
To customise the colours of the areas, we will use the `color_discrete_sequence` parameter within the `px.space()` operate. This enables us to specify a listing of colours for every class.
Code:
import pandas as pd

import plotly.categorical as px

# Create a dataframe with random values

knowledge = pd.DataFrame(

    '12 months': [2015, 2016, 2017, 2018, 2019],

    'Class A': [10, 20, 30, 40, 50],

    'Class B': [20, 30, 40, 50, 60],

    'Class C': [30, 40, 50, 60, 70]

)

# Create a stacked space chart

fig = px.space(knowledge, x='12 months', y=['Category A', 'Category B', 'Category C'], title="Stacked Space Chart",

              color_discrete_sequence=['#000000', '#FFFF00', '#800000'])

fig.present()
Output:
On this instance, now we have specified purple, inexperienced, and blue as the colours for the classes A, B, and C, respectively.
We are able to additionally customise the charts’ labels, axes, and different visible components utilizing the varied parameters offered by Plotly. For instance, we will set the x-axis label utilizing the `update_xaxes()` operate and the y-axis label utilizing the `update_yaxes()` operate.
Code:
fig.update_xaxes(title_text="12 months")

fig.update_yaxes(title_text="Worth")
These are just some examples of the customization choices accessible in Plotly. We are able to create extremely personalized and visually interesting stacked space charts by exploring the documentation and experimenting with totally different parameters.
Dealing with Lacking Knowledge in Space Charts
Lacking knowledge is a standard subject when working with space charts. It might happen for numerous causes, reminiscent of incomplete knowledge assortment or knowledge entry errors. This part will discover methods for dealing with lacking knowledge in space charts.
Coping with NaN Values in Knowledge
NaN (Not a Quantity) is a particular worth in Python that represents lacking or undefined knowledge. When plotting space charts, NaN values could cause gaps or distortions. Subsequently, you will need to deal with NaN values appropriately.
One widespread strategy is to fill the NaN values with a selected worth or interpolate them based mostly on the encircling knowledge factors. This may be performed utilizing Pandas `fillna()` operate.
Code:
knowledge.fillna(0, inplace=True)On this instance, now we have stuffed the NaN values with 0. Alternatively, we will use interpolation strategies reminiscent of linear interpolation or spline interpolation to estimate the lacking values based mostly on the neighboring knowledge factors.
Methods for Dealing with Lacking Knowledge in Space Charts
Along with filling or interpolating the lacking values, different methods can be utilized to deal with lacking knowledge in space charts. One strategy is to exclude the lacking knowledge factors from the chart fully. This may be performed by filtering the dataframe to take away rows with NaN values.
Code:
knowledge.dropna(inplace=True)Eradicating the rows with lacking values ensures that the realm chart is predicated solely on the accessible knowledge factors. Nonetheless, this strategy could lead to a lack of info if the lacking knowledge factors are important.
One other approach is to visualise the lacking knowledge individually utilizing a unique coloration or sample. This can assist spotlight the areas the place knowledge is lacking and draw consideration to potential gaps or inconsistencies.
Code:
import pandas as pd

import plotly.categorical as px

# Create a dataframe with random values

knowledge = pd.DataFrame(

    '12 months': [2015, 2016, 2017, 2018, 2019],

    'Class A': [10, 20, 30, 40, 50],

    'Class B': [20, 30, 40, 50, 60],

    'Class C': [30, 40, 50, 60, 70]

)

# Create a stacked space chart

fig = px.space(knowledge, x='12 months', y=['Category A', 'Category B', 'Category C'], title="Space Chart with Lacking Knowledge",

              color_discrete_sequence=['#000000', '#FFFF00', '#800000'],

              pattern_shape="Class C")

fig.present()
Output:
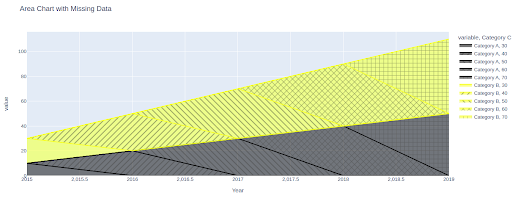
On this instance, now we have used a unique sample (represented by ‘Class C’) to point the lacking knowledge factors.
By making use of these methods, we will successfully deal with lacking knowledge in space charts and make sure that the ensuing visualizations are correct and informative.
Frequent Errors to Keep away from in Space Chart Creation
When creating space charts utilizing Matplotlib, it’s vital to concentrate on widespread errors that may result in misrepresentation of knowledge or a much less efficient chart design. By avoiding these errors, you may make sure that your space charts precisely convey info and are visually interesting.
- Misrepresenting Knowledge with Incorrect Scales: One widespread mistake is misrepresenting knowledge through the use of incorrect scales on the chart’s axes. Selecting acceptable scales that precisely replicate the vary and distribution of the info being plotted is essential. Failing to take action can lead to distorted visuals and deceptive interpretations. All the time take the time to fastidiously think about the scales and guarantee they precisely signify the info.
- Overcomplicating the Chart Design: One other mistake to keep away from is overcomplicating the design of the realm chart. Whereas including obligatory components reminiscent of labels, titles, and legends is vital, overcrowding the chart with extreme info could make it troublesome to interpret. Preserve the design clear and easy, specializing in the important thing components that should be communicated. It will make it simpler for viewers to know the chart at a look.
- Ignoring Accessibility and Usability: Accessibility and value are sometimes ignored when creating space charts. It’s vital to think about how the chart might be seen by totally different audiences, together with these with visible impairments or coloration blindness. Make sure the chart is accessible through the use of acceptable coloration palettes, offering various textual content for photos, and utilizing clear and concise labels. Moreover, think about the usability of the chart by making it interactive and permitting customers to discover the info additional.
Conclusion
In conclusion, creating space charts in Matplotlib is usually a highly effective option to visualize knowledge. By avoiding widespread errors reminiscent of misrepresenting knowledge with incorrect scales, overcomplicating the chart design, and ignoring accessibility and value, you may create efficient and visually interesting space charts. Bear in mind to fastidiously think about the scales, hold the design clear and easy, and prioritize accessibility and value. With the following tips, you may create informative and interesting space charts on your knowledge evaluation wants.